How to Generate an Authorization Token
This step-by-step guide explains how to generate an authorization token for the API in your P4 system. Tokens are used to authorize access by external systems and can be created for each system user. Organizations often create fictitious user accounts specifically for integration purposes. Each token can be named for easy identification, allowing you to trace which system is using a particular token.
Step 1: Log in to the P4 system
Open the P4 application and log in using your username and password.
Ensure you have the permissions to manage users and generate tokens. If needed, contact your system administrator.
Step 2: Navigate to the “Parametrization” module
In the main menu, select Parametrizace (Parametrization).
In the left navigation panel, click Users.
Here you will see a list of all users in your system, including fictitious accounts used by external systems.
Step 3: Select a user
Locate the user for whom you want to generate a token (e.g., a fictitious user account used by an external system).
Click on that user to open their settings.
Step 4: Go to the Tokens tab
Within the user settings, navigate to the Tokens tab.
You will see a list of previously created tokens for this user (if any), including their names and expiration dates.
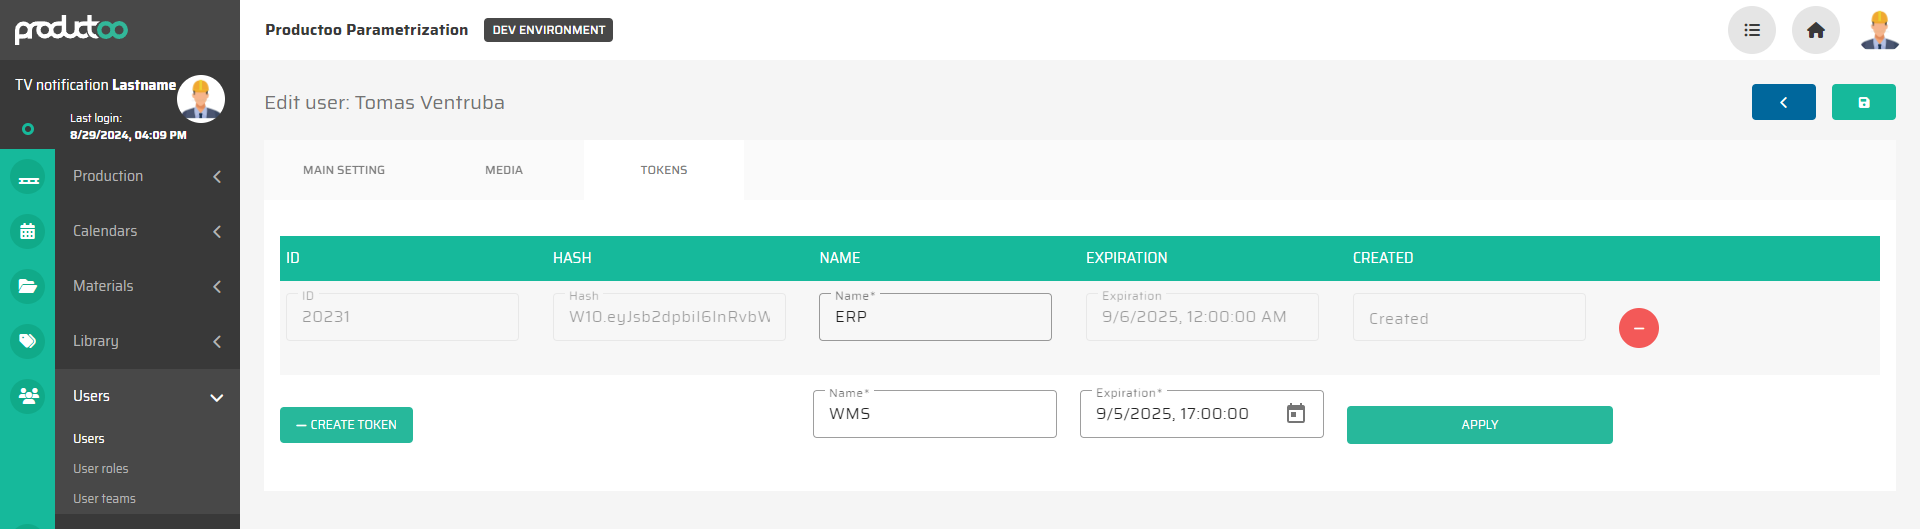
Step 5: Create a new token
Click the Create new token button.
Enter a descriptive name for the token—ideally, one that clearly indicates which system it is intended for (e.g., ERP Token or Warehouse System Token).
Set the token’s expiration period. The token may have any validity period depending on integration needs (e.g., 1 year). It is recommended to choose an expiry that aligns with your security requirements and API access management.
Step 6: Confirm and save the token
After entering the name and setting the expiration date, click Confirm.
The system will generate a new token, which will then appear in the list of tokens for that user.
Step 7: Use the token with the API
Once generated, copy the token and integrate it into the external system that will be calling the API.
The token will be used for authentication in each API call to verify access permissions.
Step 8: Manage tokens
You can review the name, expiry, and status of created tokens at any time in the tokens list.
If a token needs to be revoked, simply delete it from the list of tokens.
Conclusion
You have successfully created an authorization token, which is now ready for use by external systems to access the P4 API. Ensure token security at all times—especially when dealing with sensitive systems—and carefully manage token expiration to avoid unintended disruptions.